Looking for “ev charger installation near me” means you want a fast, reliable way to charge at home or at your building. You can usually find local installers who assess your electrical setup, recommend the right Level 2 charger, and complete installation for a typical total cost of roughly $700–$2,500 in Canada depending on equipment and electrical work.
You’ll learn how to pick a qualified installer, what questions to ask about permits and electrical capacity, and the practical steps to prepare your home or multi-unit property for a smooth install. This article walks you through choosing the right service and the preparation needed so you know what to expect and avoid common delays.
Choosing the Right EV Charger Installation Service
In EV charger installation we must focus on safety, compatibility with your vehicle and electrical panel, clear pricing, and local licensing/permits. Prioritize installers who provide written quotes, warranty details, and handle required inspections.
Factors to Consider When Selecting Installers
Check that the installer is a licensed electrician in your state or province and carries general liability plus workers’ compensation insurance. Ask for the electrician’s license number and verify it online with your local licensing board.
Look for installers with EV-specific certifications (for example, manufacturer or industry training) and several recent installations in homes like yours. Request references or online reviews and photos of completed jobs that match your driveway, garage, or commercial layout.
Confirm who pulls permits and schedules inspections, and whether the installer offers a written warranty for labor and a documented procedure for addressing problems after installation.
Types of EV Chargers Available
Level 1 uses a standard 120V outlet and supplies about 3–5 miles of range per hour; it’s best for occasional charging or plug-in hybrids. Level 2 runs on 240V and gives roughly 12–60 miles of range per hour depending on the vehicle and charger amperage; it’s the common home or workplace choice.
DC fast chargers deliver rapid charging (often 50 kW and above) and require commercial-grade electrical service and permits; these are typically for businesses or public stations. Within Level 2, choose amperage (30A–80A) based on your vehicle’s onboard charger, desired charge speed, and the capacity of your electrical panel.
Consider smart features: Wi‑Fi/ethernet connectivity, scheduling, load sharing, and app monitoring. Ensure the connector type (most commonly SAE J1772 in North America) matches your vehicle or that an adapter is available.
Estimating Installation Costs
Typical residential Level 2 installs vary widely: expect a baseline unit cost plus labor and materials. Basic installs where a 240V circuit already exists often run lower; complex installs requiring panel upgrades, trenching, or long conduit runs increase cost materially.
Ask for a line‑item estimate that breaks down charger price, new circuit installation, permitting fees, panel upgrade costs, conduit/trenching, and any site-specific work (meter relocation, ground rods). Get at least three written quotes to compare scope and assumptions.
Factor in available incentives or rebates from utilities and government programs that reduce net cost. Confirm whether the installer will apply for incentives or provide the required documentation for you to claim them.
Evaluating Local Service Providers
Compare installers on these concrete criteria: current license status, proof of insurance, documented EV training, number of completed installations in the past 12 months, and average customer rating with recent reviews. Check local permit pull history if available.
Request a site visit and a written proposal that includes timeline, disruption expectations, specific materials, and a payment schedule. Verify who will handle permits, inspection scheduling, and final sign-off.
Use a simple checklist when calling prospects:
- License number verified
- Insurance confirmed
- Written, itemized quote received
- References or photos of similar installs provided
- Warranty terms and post‑install support defined
Preparation and Steps for EV Charger Installation
You’ll assess your site, confirm electrical capacity, secure permits, and schedule a licensed electrician for installation. Plan specific measurements, circuit requirements, and timing before work begins to avoid delays and extra costs.
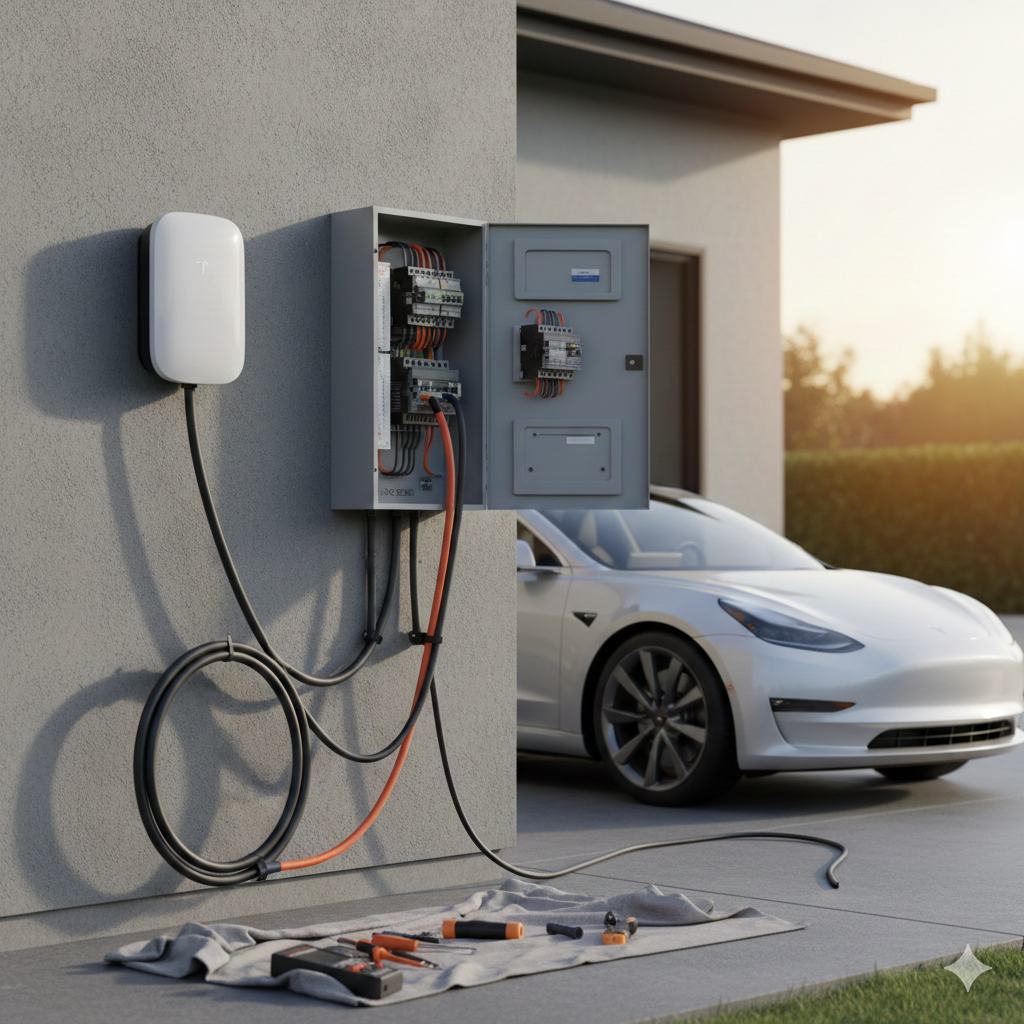
Site Assessment and Electrical Requirements
Measure the distance from your electrical panel to the parking spot and note conduit run obstacles like finished walls or landscaping. Determine whether you need a new 60A circuit for typical Level 2 chargers or a smaller 30A circuit for lower-power units; list the breaker size, wire gauge, and conduit type for your installer.
Check your panel’s available capacity. Look for an open breaker space or whether a panel upgrade (100A or 200A service considerations) or subpanel is required. Record your typical charging needs (miles/day) to choose charger amperage.
Confirm charger mounting: wall-mount vs. pedestal, indoor vs. outdoor rated enclosure, and clearances for cable management. Photograph the panel, route, and parking area to share with contractors and for permit applications.
Installation Timeline and Process
Expect a multi-step process: site assessment (1 day), permit approval (varies), electrical work (2–8 hours), and final inspection. Typical residential installs take a few days to a few weeks depending on permit lead time and whether a service upgrade is needed.
On install day, the electrician will shut power, run conduit, pull wire, install a dedicated breaker, mount the charger, and perform grounding and GFCI/RCBO protection. They will program any smart functions and test charge with your vehicle. If trenching or concrete work is needed, add one to three days for civil work.
Schedule the final municipal inspection and utility interconnection if required. Keep communications clear: confirm arrival windows, required access to the panel, and whether your EV must be present for testing.
Permits and Safety Regulations
Contact your local building department to determine required permits—electrical permit and sometimes mechanical or plumbing permits if trenching affects drainage. Permit fees and review times vary by jurisdiction; prepare to submit wiring diagrams, panel photos, and site plans.
Follow electrical code and manufacturer specs: correct breaker size, wire gauge, conduit fill, and charger-specific mounting height. Ensure installation complies with NEC Article 625 (or your local equivalent) for EV charging equipment and any utility interconnection rules.
Hire a licensed electrician and retain documentation: permit approval, inspection certificate, and installer warranty. These records protect you for resale, insurance claims, and incentive applications such as rebates or ZEVIP-style programs.